Miscellaneous
Frame View
Frame view is where the output frames (images) from the tool flow are displayed. The user can specify which frame to display, from the tools are sources in the flow.
Add New Frame

To add a new frame to the frame view, click on the + Add frame view button. A new frame will be added to the frame view.
Select View Source

-
Click on the
Select view sourcebutton to open a dialog box for source selection. -
Select the tool's output frame from the list of available tools.
-
Select the tool's input source from the list of available sources.
The tool can be the same tool as the source. For example, the Image tool can be the source for the Image tool.
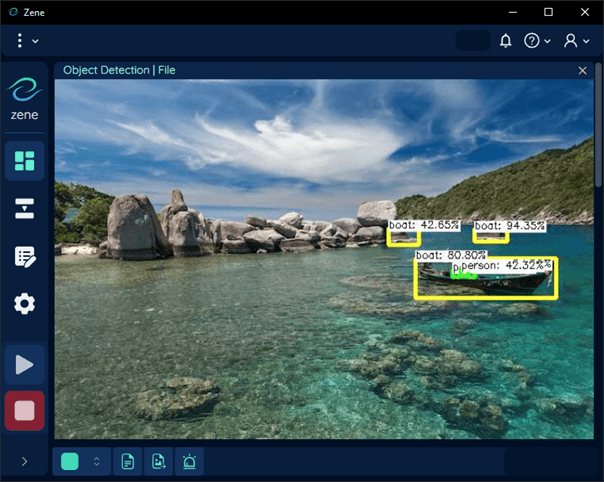
In the image above the Object Detection tool is the source for the File tool.
The frame view will be displayed with after the tool flow has been executed.
Frame View Layout
Layout
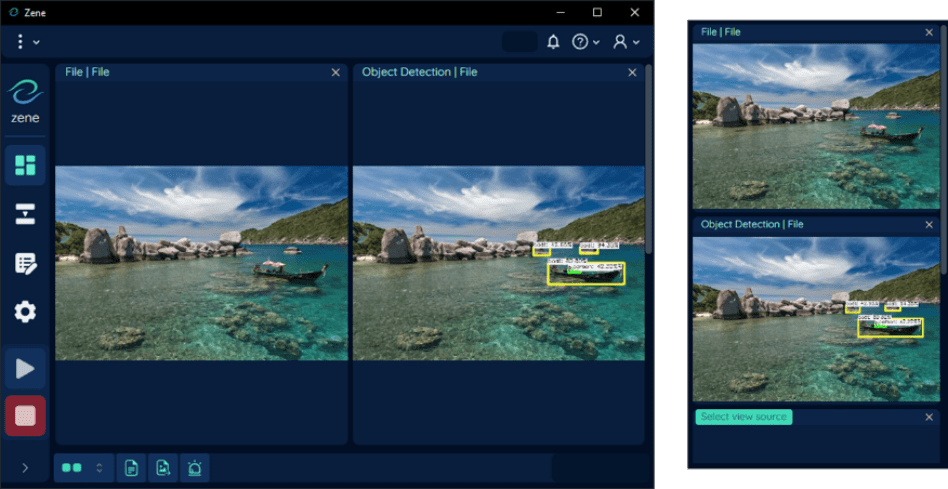
The frame view layout can be changed up to a maximum of five (5) columns, see Dashboard - Frame View Column for more information.
In the image above (left), the frame view layout is set to two (2) columns, where the first column is the File tool with File source and the second column is the Object Detection tool with File source.
Other Pages
Within the other pages, the frame view layout is set to one (1) column and are stacked vertically, as shown in the image above (right).
If the viewport width is too small, the frame view will be hidden.
File Explorer
File Explorer Layout
The file explorer is where the files and folders are displayed. It is used to select the files and folders for the various purposes in Zene.
The file explorer is consists of the following:
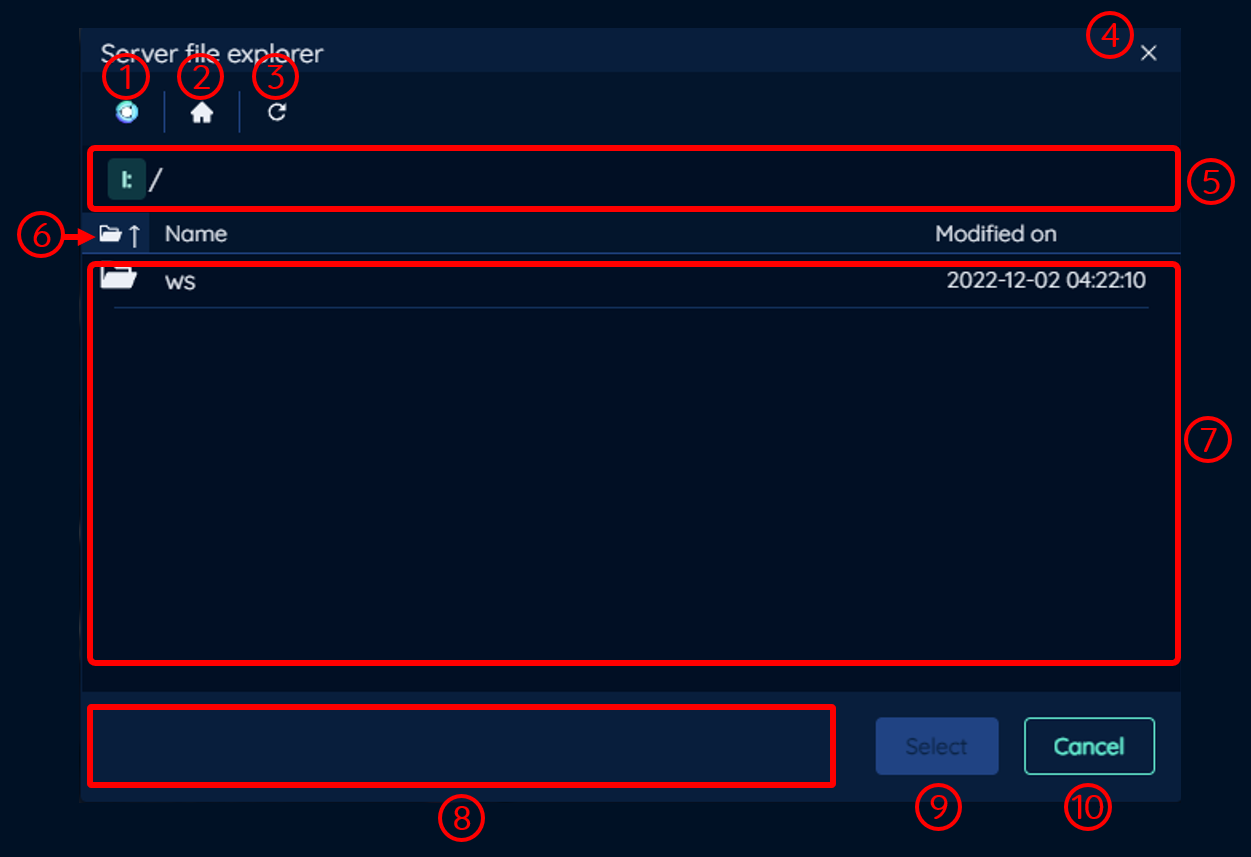
Navigate to Zene User Directory
Number 1
See Zene User Directory for more information.
Navigation to Root Directory
Number 2
This will navigate to the root directory of the file explorer.
-
For Windows:
The root directory is the same as This PC in the Windows File Explorer. -
For Linux:
The root directory is the same as the/directory.
Refresh
Number 3
Click to refresh the current directory.
Close Button
Number 4
Click on the close button to close the file explorer.
Navigation Path
Number 5
This is the navigation path to the current folder. Each of the folder name is separated by a / character and can be clicked to navigate to the folder. The path is relative to the root directory.
The user can click on the folder name to navigate to the desired folder within the path.
Sort By
Number 6
Click on the sort by button to sort the files and folders by the following from left to right:
Type:
Sort by the file type.Name:
Sort by the file name in alphabetical order.Date Modified:
Sort by the date modified.
To change the sort order, click on the sort by button again. This will change the sort order from ascending to descending and vice versa.
File and Folder List
Number 7
This is a file explorer showing the contents of the current folder. Each item is represented by an icon, a name, and the modified date. The display of files and folders can vary depending on the purpose of the file explorer.
For example, when the user select a specific file type, such as a .zene file (tool flow save file), only files with the .zene extension will be displayed. However, folders will always be visible to facilitate navigation through the directory structure.
Select Folder/ File Name
Number 8
This is where the selected folder or file name is displayed.
Select Button
Number 9
Click on the select button to select the folder or file.
The select button is only available when a folder or file is selected.
Cancel Button
Number 10
Click on the cancel button to cancel the selection.
Icons

Image above shows the icons used in the file explorer. Here is the list of icons and their descriptions:
- Folder
- File - Zene save file (
.zene) - File - Video
- File - Text
- File - AI Model
- File - Image
- File - Audio
- File - Zipped file (
.zip) - File - Other file types
Help Menu
Zene License

The Zene license modal displays the Zene license information. The following information is displayed:
- Status: The status of the license.
- Version: The version of the server the license is for.
- Type: The license's attached type.
- Server machine ID: The current server's machine ID.
- Tier: The tier of the license.
- Input tools: The number of input tools allowed.
- Total tools: The total number of tools allowed.
- UI clients: The number of total connected UI clients (Zene UI) allowed.
Legal Summary
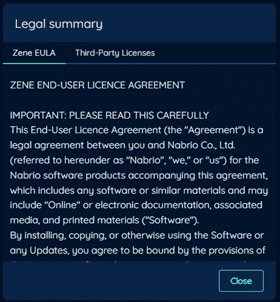
The legal summary modal displays the legal information for Zene. The following information is displayed:
- EULA: The End User License Agreement for Zene.
- Third Party Licenses: The third party licenses used in Zene.
About

The about modal displays the following information:
- Server version: The version of the connected Zene Server.
- UI version: The version of the Zene UI.
- Copyright: The copyright information.
- Nabrio website: The link to the Nabrio website.
Zene User Directory
This is the root folder of Zene. All the files frequently used by Zene are stored in this folder. The following files and folders are stored in the Zene user directory:
autosaves: The folder where the autosaved files are stored.configs: The folder where the configuration files are stored.preferences.cfg: The preferences file. See Preferences for more information.users_data.bin: The user data file. See User Data for more information.
license key: The folder where the license key is stored.key_zene.lic: The license key file. See Server License for more information.
logs: The folder where the logs are stored. See Logs for more information.Models Dnn: The folder where the AI models are stored, this folder is empty by default. For more information about the model files, see Model Folder Structure.saves: The folder where the saved files are stored, this folder is empty by default.
Windows
The location of the Zene user directory is C:\Users\{user}\Documents\Nabrio\Zene 1.
Server Files
Tool Flow Save
The tool flow process can be saved as a file and loaded into another Zene application. The saved file is in JSON format and has the extension .zene.
Zene Server or Zene UI CANNOT be started with a saved file. The saved file can only be loaded from the Zene Server or Zene UI.
The saved file is not encrypted. Keep the saved file in a secure location or do not have any sensitive information in the saved file.
Preferences
The preferences file (preferences.cfg) stores the user's preferences for Option - General and Option - Tools.
The saved file is in JSON format and has the extension .cfg and stored in the Zene user directory.
The preferences file is not encrypted. Make sure that people who have access to the preferences file are authorised to view the preferences.
User Data
The user data file (users_data.bin) stores the user's information. The saved file is in binary format and has the extension .bin and stored in the Zene user directory.
The password is stored within the file is encrypted. This means that even the admin user role cannot view the password.
Even though the user data file is in binary format, most of the information stored are not encrypted. Make sure that people who have access to the user data file are authorised to view the user data.